I ran across a portable automotive tool tray while looking around online. What is it you ask? It’s an adjustable height, rolling, tray that is used to put mechanic’s tools on while working on a vehicle. I thought one would be nice because I have a tendency to place tools around the engine bay while working. Later on I have to gather them all up which can lead to a small mystery if I’ve missed one. I read some reviews on it and there were some bad ones. Some reviews said that it was flimsy and the welds were poor. I said to myself, “I can do better. I can made a sturdy tool tray with bad welds!” And I did.
Since I was making the tool tray myself I wanted it to have a height range that accommodated both my car and truck. Originally, I wanted to make the tray portion fold down but as I was designing it I found it wasn’t possible with the height range I needed. Here’s a picture of what I made. It adjusts between 34.5″ to 52.5″ and can be set at 3″ intervals between.

I started by working on the tray. It’s constructed out of 1″ x 1/8″ thick angle and measures 21″ x 14.5″ which allowed me to get all of the pieces out of a 72″ long stick. The 1″ height will allow me to put a board inside for the tools to rest on. I mitered the corners and welded it together. I recommend welding on the bottom of the tray so that the board will rest on the frame instead of rocking on the welds. Alternatively, you can weld on the inside and grind them down.

Most of the rest of the moble tool tray is made out of 1″ square tubing that I got from Gill. I used my overgrown hacksaw to cut it down to size.

The bottom of the mobile tool tray has the center section offset so that more of the tray overhangs the engine bay. I didn’t want to to move it all the way to the edge so that I could put some bracing on it. Here I’ve got the base of it clamped down and ready to weld.

After welding the base I started on the vertical piece that the top part slides in. It’s made out of 1-1/4″ square tubing. To position the top part I thought about using a pin but decided it would be easier to weld a nut to one side. A through pin or bolt is preferable to using a bolt that would just press against the sliding tube as it greatly reduces the chance of the top sliding down under weight.

After finishing with the 1-1/4″ tubing it was back to the little welding table to attach it. I welded it on and then braced it with additional scrap material.


To support the top I used another piece of 1″ square tubing that would slide inside of the 1-1/4″ piece. I positioned the first hole at 6″ from one end and then drilled additional holes every 3″.
 The inside of the 1-1/4″ tubing was a larger than the outside of 1″ tubing. To compensate for this, I welded a small plate on the bottom back side of the 1″ tubing. This is the location that presses against the inside of the larger tubing and will keep the top assembly from rattling around.
 With that done, it was back to the tray to start welding the bracing that would connect it to the vertical 1″ square tubing. I cut the bracing a little shorter than the dimensions of the top and welded it into place.

Finally, I could put the pieces together and test it. Here it is at the lowest height.

Now it is raise to the max height holding my jack to prove to myself that it won’t fall apart with some weight on it. I’d planned to weld some casters to the tool tray but instead decided to use some stem casters. It would have been easier to drill the holes for the stems before assembly but I was able to get them drilled with my drill press after this pic.

Next up was painting in my custom fresh air paint booth. I sanded it all with a flap disk and put on a coat of primer from a spray can. After the primer had dried, I put on a top coat and watched the bugs jump into the paint. Yay…I guess they like red.

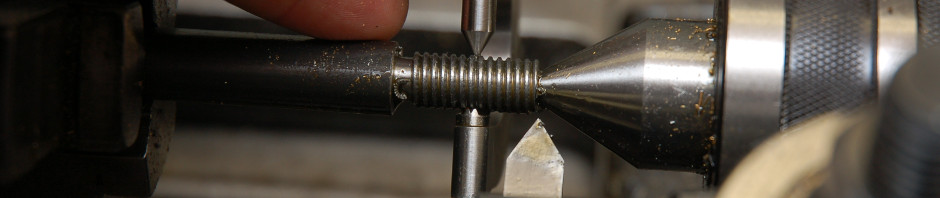
I mentioned above about welding a nut on for a bolt to keep the top half of the tool tray in place. While I was waiting for the paint to dry I turned a piece to use instead of a bolt. Other than my knurling not being deep enough it works as expected.

Once the paint had dried a couple days, I installed the casters and put it back together.

I grabbed a scrap piece of 1/2″ plywood to use as my work surface. It is held in there by its own weight and can be replaced in the future if needed.

If you’d like to make a copy of the mobile tool tray, here’s a small drawing that lists the basic dimensions. I don’t have any of the sheet metal bracing or lower 1-1/4″ tube support pictured here but their size isn’t critical. You can use whatever size suits you.

